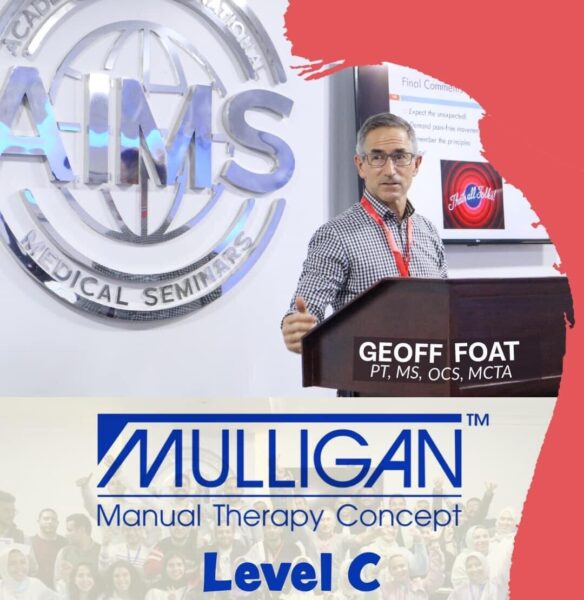
Mulligan – Manual Therapy Concept Level A and B

Get course
Enrolled: 1044 students
Lectures: 84

Working hours

Monday 10:00 am - 4.00 pm
Tuesday 10:00 am - 4.00 pm
Wednesday 10:00 am - 4.00 pm
Thursday 10:00 am - 4.00 pm
Friday Closed
Saturday 10:00 am - 4.00 pm
Sunday 10:00 am - 4.00 pm

Mulligan – Manual therapy Concept Course
Part A:  Upper Quarter – Peripheral Joints, Cervical and Thoracic Spines
Part B:  Lower Quarter – Peripheral Joints, Lumbar Spine and Sacroiliac joints.

About the Tutor: Ahmed M. Hefny

DPT, MCTA, CMTT, CDNT, KCMT
An Internationally Accredited Instructor in the Mulligan Concept in 2022, after co-teaching extensively assisting many international teachers in different countries (Egypt, Saudi Arabia, UAE, South Africa, Turkiya and Jurdan). Currently, Ahmed is splitting his time between Teaching (Mulligan Concept, OMT, Sports physiotherapy and DN) in many countries, and managing many Msk / sports conditions in his own practice in Hurghada.

Courses Include
Considerable hands on learning experience, Self-treatment concepts, Mulligan taping and sound clinical reasoning to apply mobilization with movement on patients. Participants can expect to be provided with research information and evidence based practice in the applying these manual therapy techniques developed by Brian Mulligan.

Course Description and Curriculum please visit this link
https://bmulligan.com/descriptions-and-curriculum/

Further details and Booking Please Contact:
+201067906745
+201050771120
Email: info@physioaims.com

Cervical Spine Region

1
Cervical – Central NAG
2
Cervical – Reverse NAG
3
Cervical – Headache SNAG
4
Cervical – Reverse Headache SNAG
5
Cervical – Positional SNAG
6
Cervical – SNAG (Ext/Flex)
7
Cervical – SNAG (Rotation)
8
Cervical – Upper Traction (Forearm)

Thoracic Spine Region

1
Thoracic – First Rib MWM
2
Thoracic – Lower Rib MWM
3
Thoracic – SNAGS (Rotation)
4
Thoracic Traction (Belt)

Lumbar Spine and SIJ Region

1
Lumbar – L1-4 Extension SNAG (Prone)
2
Lumbar – L1-4 Flexion SNAG (4 Point Kneeling)
3
Lumbar – L1-4 SNAG (Standing)
4
Lumbar – L5-S1 SNAGS – Standing
5
Lumbar – SNAG (Sitting)
6
Lumbar L1-4 SNAG – Standing
7
SIJ Ant. GL. MWM – WB (Trunk Ext/Flex)
8
SIJ Ant. GL. Self MWM – WB (Belt)
9
SIJ Ant. GL. Taping
10
SIJ Ant. MWM – NWB (Trunk Extension)
11
SIJ Post. GL. MWM – WB (Walking)
12
SIJ Post. MWM – WB (Trunk Extension)
13
Traction SLR (TrSLR)
14
Two-leg Rotation (Gate)
15
Bent Leg Raise (BLR)

Shoulder Region

1
Shoulder MWM – Elevation (Belt)
2
Shoulder – HBB MWM
3
Shoulder Elevation MWM – Against Wall
4
Shoulder Elevation MWM – Against Wall (Belt)
5
Shoulder Self MWM
6
AC Elevation MWM

Elbow Region

1
Elbow – Tennis Elbow Self MWM
2
Elbow Lat glide MWM Fle/Ext
3
Elbow – Distal RU Taping
4
Elbow – Lat GL MWM – Extension (Belt)
5
Elbow – LAT GL MWM – Flexion (Belt)
6
Elbow – Proximal RU A-P – NWB – Extension
7
Elbow – Proximal RU P-A MWM – WB (Extension)
8
Elbow – Tennis Elbow MWM (Belt)
9
Elbow – Proximal RU P-A Taping

Wrist and Hand Region

1
Hand – 5th on 4th MC Taping
2
Hand – PIP MWM
3
Hand – Scaphoid MWM – NWB (Wrist Extension)
4
Hand – Scaphoid Taping
5
Wrist – Distal RU MWM (Pronation)
6
Wrist – Distal RU MWM (Supination)
7
Wrist – Proximal Carpal Row MWM
8
Wrist – Proximal Carpal Row Taping
9
5th on 4th MC MWM (First Clenching)

Hip Region

1
Hip – Abduction MWM – WB
2
Hip – Extension MWM
3
Hip – Extension MWM – WB
4
Hip – Int. Rot. MWM – WB
5
Hip – Extension with Traction MWM
6
Hip – Flexion MWM – NWB
7
Hip – Flexion MWM – WB
8
Hip – Int. Rot. MWM – NWB

Knee Region

1
Knee – Lat. GL. MWM Belt – NWB (Flexion)
2
Knee – Lat. GL. MWM Belt – NWB (Flexion)
3
Knee – Med. GL. MWM – NWB (Belt)
4
Knee – Med. GL. Self MWM – PWB (Flexion)
5
Knee – Meniscal Squeeze
6
Knee – Post Glide MWM – NWB (Flexion)
7
Knee – Tibia Int. Rot. Self MWM – PWB (Flexion)
8
Knee – Tibial Int. Rot. MWM – NWB (Flexion)
9
Knee – Tibial Int. Rot. MWM – PWB (Flexion)
10
Knee – Tibial Int. Rot. Taping – WB
11
Knee – Lat. GL. MWM Belt – NWB (Extension)

Foot and Ankle Region

1
Foot – 1st MTP MWM – NWB
2
Foot – 1st MTP MWM – WB
3
Foot – 3rd on 4th MT MWM
4
Foot – 5th MT ON CUBOID MWM
5
Foot – 5th MT on CUBOID Taping
6
Foot – 5th on 4th MT MWM
7
Foot – Achilles Tendon Taping
8
Foot – Ankle DF MWM – NWB
9
Foot – Ankle DF MWM – WB (Belt)
10
Foot – Ankle PF MWM
11
Foot – Ankle Sprain Fibula Taping
12
Foot – Planter Fascia Taping
13
Foot – Planter Fascia Taping (Alternative Hold)
14
Foot – Ankle Sprain Fibula MWM – NWB

Be the first to add a review.

Please, login to leave a review